
Step-by-Step Guide: How to Successfully Propagate Succulents at Home

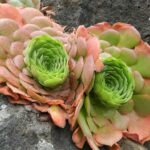
Succulents have become increasingly popular in recent years, admired for their unique and striking appearance, as well as their low-maintenance nature. These plants are known for their ability to store water in their leaves, stems, and roots, making them highly adaptable to various climates and environments. Whether you are a seasoned gardener or a novice plant enthusiast, learning how to propagate succulents can be a rewarding and enjoyable experience.
We will provide a step-by-step guide on how to successfully propagate succulents at home. We will cover the different methods of propagation, including leaf and stem cuttings, as well as division. Additionally, we will discuss the necessary tools and materials you will need, along with tips for caring for your newly propagated succulents. By following these instructions, you will be able to expand your succulent collection and create beautiful arrangements of these resilient and stunning plants.
Content
- Use well-draining soil for your succulent cuttings
- Allow the cuttings to callous over before planting them
- Plant the cuttings in a small pot with good drainage
- Place the pot in a bright, indirect sunlight location
- Water the cuttings sparingly to avoid rotting
- Mist the cuttings occasionally to provide humidity
- Wait for roots to develop before watering more frequently
- Transplant the succulents into larger pots as they grow
- Step 1: Choose the right time
- Step 2: Select the appropriate pot
- Step 3: Prepare the new pot
- Step 4: Gently remove the succulent from its current pot
- Step 5: Inspect the roots and remove any damaged or rotten parts
- Step 6: Place the succulent in the new pot
- Step 7: Allow the succulent to settle and water sparingly
- Provide regular sunlight and water, but avoid overwatering
- Enjoy watching your propagated succulents thrive at home
- Frequently Asked Questions
Use well-draining soil for your succulent cuttings
When propagating succulents at home, it is crucial to use well-draining soil for your succulent cuttings. Succulents have shallow root systems and are prone to root rot if the soil retains too much moisture.
When choosing soil for your succulent cuttings, opt for a well-draining mix that is specifically formulated for succulents or cacti. These mixes typically consist of a combination of sand, perlite, and a lightweight potting mix.
Alternatively, you can create your own well-draining soil mix by combining equal parts of potting soil, coarse sand, and perlite. This mixture will provide the necessary drainage for your succulent cuttings while still retaining some moisture.
Why is well-draining soil important for succulent cuttings?
Succulents originate from arid regions where they have adapted to survive in dry conditions. Their leaves and stems are designed to store water, allowing them to withstand drought. However, this also means that they are susceptible to overwatering and root rot.
 The Cause of Tall Growth and Limited Spreading in Succulents
By using well-draining soil for your succulent cuttings, you ensure that excess water can easily drain away, preventing the roots from sitting in stagnant water. This promotes healthy root growth and reduces the risk of root rot.
How to prepare your well-draining soil
If you are using a pre-packaged succulent or cactus mix, you can skip this step. However, if you are creating your own well-draining soil mix, follow these steps:
- Mix equal parts of potting soil, coarse sand, and perlite in a large container.
- Thoroughly combine the ingredients until they are well blended.
- You can adjust the ratio of sand and perlite based on the specific needs of your succulents. Some succulents prefer a grittier mix, while others may require a slightly higher percentage of potting soil for moisture retention.
- Once the soil mix is ready, fill your pots or containers with the mixture, leaving some space at the top for watering.
Remember to water your succulent cuttings sparingly
While well-draining soil is essential for succulent propagation, it is equally important to water your succulent cuttings sparingly. Overwatering can lead to root rot and ultimately result in the death of your succulents.
When watering your succulent cuttings, make sure to allow the soil to dry out between waterings. Stick your finger about an inch into the soil, and if it feels dry, it's time to water. Water thoroughly until it drains out of the bottom of the pot, and then allow the soil to dry out before watering again.
By using well-draining soil and practicing proper watering techniques, you will set your succulent cuttings up for success and ensure healthy growth.
 Guide: How to Successfully Propagate an Ogre Ear Succulent
Allow the cuttings to callous over before planting them
Before planting your succulent cuttings, it is crucial to allow them to callous over. This process involves allowing the cut ends of the plant to dry and form a protective layer. This calloused layer helps prevent the cuttings from rotting when they are planted in the soil.
To callous over your succulent cuttings, you can follow these simple steps:
- Take your cuttings: Carefully cut a healthy stem or leaf from the parent succulent plant. Make sure to use clean and sharp pruning shears to avoid damaging the plant.
- Let the cuttings dry: Place the cuttings in a cool, dry location away from direct sunlight. This will allow the cut ends to dry out and form a calloused layer. It usually takes around 1-3 days for the cuttings to callous over, depending on the thickness of the plant tissue.
- Ensure proper air circulation: It is essential to provide adequate air circulation around the cuttings to promote the drying process. Avoid placing them in an area with high humidity, as this can hinder the callousing process.
- Check for readiness: After a few days, gently touch the cut ends of the succulent cuttings. If they feel firm and dry to the touch, they are ready to be planted. If they still feel soft or moist, give them more time to callous over.
By allowing your succulent cuttings to callous over before planting, you are ensuring a higher success rate when it comes to propagation. This step is especially important for preventing rot and disease, which can be detrimental to the growth and survival of your succulents.
Plant the cuttings in a small pot with good drainage
When propagating succulents, it is important to provide them with a suitable environment to encourage healthy growth. Start by selecting a small pot with good drainage. This will prevent water from pooling at the bottom and potentially causing root rot.
Choose a pot that is slightly larger than the size of the cutting to allow room for growth. Fill the pot with a well-draining succulent soil mix, ensuring that it is evenly distributed.
 Alternative Methods of Propagating Succulents: Beyond Seeds
Step 1: Gently remove the leaves or offsets from the parent plant. Carefully twist or cut them off, ensuring that you have a clean cut without damaging the stem or leaves.
Step 2: Allow the cuttings to dry and callus over for a few days. This step is crucial as it helps prevent rotting when the cuttings are planted.
Step 3: Once the cuttings have calloused, make a small hole in the soil using your finger or a pencil. Insert the cut end of the cutting into the hole, ensuring that it is buried deep enough to provide stability.
Step 4: Gently press the soil around the base of the cutting to secure it in place. Be careful not to apply too much pressure, as succulents have delicate roots that can easily be damaged.
Step 5: Water the newly planted cuttings sparingly. Succulents have low water requirements, so it is important not to overwater them. Allow the soil to dry out between waterings to prevent root rot.
Step 6: Place the pot in a bright area with indirect sunlight. Succulents thrive in bright light conditions, but direct sunlight can scorch their leaves. A windowsill or a well-lit spot in your home would be ideal.
Step 7: Monitor the cuttings regularly and provide them with proper care. Keep an eye out for any signs of overwatering, such as yellowing leaves or mushy stems, and adjust your watering schedule accordingly.
 Can Succulent Plants Reproduce and Become Pregnant?
By following these steps, you can successfully propagate succulents at home and enjoy the process of watching them grow into new plants. Remember to be patient and give your cuttings time to establish roots before expecting significant growth.
Place the pot in a bright, indirect sunlight location
One of the most important factors for successfully propagating succulents is providing them with the right amount of sunlight. Place your pot in a location that receives bright, indirect sunlight. This means avoiding direct sunlight, as it can scorch the leaves of the succulents.
To ensure optimal sunlight exposure, consider placing your pot near a window that receives a good amount of sunlight throughout the day. If you notice that your succulents are not receiving enough light, you can supplement their sunlight requirements with the help of artificial grow lights.
Remember that different succulent species have different sunlight preferences, so it's always a good idea to research the specific needs of the succulents you are propagating.
Water the cuttings sparingly to avoid rotting
When propagating succulents at home, it is crucial to water the cuttings sparingly to avoid rotting. Succulents are known for their ability to store water in their leaves and stems, making them highly adaptable to dry environments. However, they are susceptible to root rot if overwatered.
 Succulent Propagation: A Guide to Time Required
Step 1: After taking cuttings from a mature succulent, allow them to dry for a few days. This process is called callousing and helps prevent the cuttings from absorbing too much water.
Step 2: Once the cuttings have calloused, prepare a well-draining soil mix. A combination of potting soil, perlite, and coarse sand is ideal for succulents. Fill a small container with the soil mix, leaving some space at the top for the cuttings.
Step 3: Gently insert the calloused end of each cutting into the soil, ensuring that at least one node is below the surface. Nodes are where new roots will form. It is essential to keep the leaves above the soil to prevent them from rotting.
Step 4: Once the cuttings are planted, water them lightly. A good rule of thumb is to water until the soil is damp but not saturated. Be careful not to pour water directly onto the leaves, as this can lead to rot. Alternatively, you can mist the soil with a spray bottle.
Step 5: Allow the soil to dry out completely before watering again. Succulents prefer a dry environment, and overwatering can be detrimental to their growth. It is better to underwater than to overwater succulent cuttings.
Step 6: Place the container in a spot with bright, indirect sunlight. Succulents thrive in well-lit areas but can get sunburned if exposed to too much direct sunlight. A south-facing window or a spot near a bright window is usually ideal.
Step 7: Monitor the cuttings regularly to ensure they are not showing signs of rot or dehydration. If any leaves start to turn mushy or appear shriveled, adjust your watering schedule accordingly.
 Indoor Gardening: Growing Spider Web Succulents at Home
Step 8: In a few weeks, you should start to see new roots forming at the nodes of the cuttings. This indicates that the propagation process is successful. Once the roots have developed, you can gradually increase the watering frequency.
Step 9: After a few months, the propagated succulents should have established roots and be ready for transplanting into individual pots. Make sure to use well-draining soil and provide them with the appropriate amount of sunlight and water.
By following these steps and watering your succulent cuttings sparingly, you can successfully propagate new plants at home. Remember, succulents are resilient, but they thrive in dry conditions, so it's better to underwater than overwater. Happy propagating!
Mist the cuttings occasionally to provide humidity
When propagating succulents at home, it's important to create a favorable environment for the cuttings to root and thrive. One way to do this is by misting the cuttings occasionally to provide humidity. Succulents are native to arid regions and are adapted to survive in low humidity environments. However, when propagating, they may benefit from a slightly higher humidity level.
Misting the cuttings helps to mimic the conditions they would experience in their natural habitat. It can prevent excessive moisture loss and aid in the development of healthy roots. To mist the cuttings, fill a spray bottle with distilled water and gently spray the leaves and stems. Be careful not to saturate the soil, as this can lead to overwatering and potentially rot the cuttings.
It's important to note that misting should be done sparingly and not excessively. Over-misting can create an environment prone to fungal growth and diseases. Aim to mist the cuttings once or twice a week, or whenever the leaves appear slightly wrinkled or dehydrated.
In addition to misting, you can also create a mini greenhouse effect by covering the cuttings with a clear plastic bag or using a propagating tray with a transparent lid. This helps to retain moisture and create a more humid environment around the cuttings. However, it's crucial to remove the cover periodically to allow fresh air circulation and prevent the growth of mold or mildew.
 Exploring Root Depths in Succulents: Understanding Root Growth
Remember, misting is just one aspect of successful succulent propagation. It's essential to provide the right amount of light, well-draining soil, and proper watering to ensure the cuttings establish healthy roots and grow into mature plants.
Wait for roots to develop before watering more frequently
Watering succulents can be a bit tricky, especially when you're trying to propagate them. One of the most important things to keep in mind is to wait for the roots to develop before watering more frequently. This step is crucial for the successful propagation of succulents at home.
Succulents have the unique ability to store water in their leaves, stems, and roots. This adaptation allows them to survive in dry and arid conditions. When you propagate succulents, it's essential to mimic their natural environment to ensure their healthy growth.
During the initial stages of propagation, succulents rely on their stored water reserves. Therefore, it's crucial not to overwater them, as this can lead to rotting and other issues. Instead, you should wait for the roots to develop before increasing the frequency of watering.
So, how do you know when the roots have developed enough to start watering more frequently? One way to check is by gently tugging on the leaves or the base of the new plants. If you feel resistance, it's a positive sign that the roots have started to establish. However, if the plant easily comes out of the soil, it's an indication that the roots are not yet strong enough.
Once you've determined that the roots have developed, you can gradually increase the watering frequency. Start by watering your propagated succulents once a week, ensuring that the soil is completely dry before each watering session. As the plants mature and their root system strengthens, you can adjust the watering schedule accordingly.
 Vertical Succulents: Discover Which Types Grow Straight Up
Remember that succulents prefer well-draining soil. This means that the potting mix should allow excess water to escape easily, preventing waterlogging and root rot. Additionally, it's important to use a watering method that allows the water to reach the roots directly, such as bottom watering or using a narrow spout watering can.
By following these steps and waiting for the roots to develop before watering more frequently, you'll provide your propagated succulents with the optimal conditions for growth and ensure their long-term health.
Transplant the succulents into larger pots as they grow
Transplanting succulents into larger pots is an essential step in successfully propagating them at home. As your succulents grow, they will outgrow their current containers and need more space for their roots to spread.
Here is a step-by-step guide on how to transplant your succulents into larger pots:
Step 1: Choose the right time
It's crucial to choose the right time to transplant your succulents. The best time is during their active growing season, typically in spring or early summer. Avoid transplanting during the dormant period as it can stress the plants.
Step 2: Select the appropriate pot
Choose a pot that is slightly larger than the current one, allowing enough room for the succulent to grow. Ensure the new pot has drainage holes to prevent waterlogging, which can lead to root rot.
 Can Succulents Easily Spread and Overrun Gardens?
Step 3: Prepare the new pot
Before transplanting, fill the new pot with a well-draining succulent soil mix. You can create your own mix by combining equal parts of potting soil, perlite, and coarse sand. This mixture ensures adequate drainage and prevents water retention.
Step 4: Gently remove the succulent from its current pot
Take care while removing the succulent from its current pot to avoid damaging the roots. Gently loosen the soil around the plant using your fingers or a small gardening tool. Hold the plant by its base and slowly lift it out of the pot.
Step 5: Inspect the roots and remove any damaged or rotten parts
Once the succulent is out of the pot, carefully inspect its roots. Trim away any damaged or rotting roots using clean, sharp scissors or pruning shears. Cutting back the roots will encourage new growth and prevent potential diseases.
Step 6: Place the succulent in the new pot
Position the succulent in the center of the new pot, ensuring it sits at the same depth as it was in the previous pot. Gently fill the sides with the prepared soil mix, pressing it down lightly to secure the plant in place.
Step 7: Allow the succulent to settle and water sparingly
After transplanting, give the succulent some time to adjust to its new environment. Avoid watering immediately, as it can lead to overwatering. Wait for a few days before lightly watering the plant, allowing the roots to settle and establish themselves.
Following these steps will ensure a successful transplant and provide your succulents with the space they need to thrive and grow. Remember to monitor their growth and repeat the process as necessary to accommodate their increasing size.
Provide regular sunlight and water, but avoid overwatering
 Step-by-Step Guide to Propagating Bear Paw Succulent from a Leaf
When it comes to successfully propagating succulents at home, providing the right amount of sunlight and water is crucial. Succulents are known for their ability to store water in their leaves and stems, making them tolerant to drought conditions. However, this doesn't mean they can survive without water altogether.
First and foremost, it's important to place your succulents in an area where they can receive ample sunlight. Most succulents thrive in bright, indirect light. Placing them near a south-facing window or in a spot with several hours of sunlight a day is ideal. However, be cautious of intense, direct sunlight, especially during the hottest parts of the day, as it can scorch the leaves of your succulents.
When it comes to watering your succulents, it's essential to strike a balance. Overwatering is one of the most common mistakes made by succulent enthusiasts, as succulents are prone to root rot and other issues when sitting in wet soil for extended periods. As a general rule of thumb, allow the soil to dry out completely between waterings. This means sticking your finger into the soil and ensuring it's dry at least an inch deep before watering again.
Another helpful tip is to water your succulents from the bottom rather than pouring water directly onto the leaves or soil. This allows the roots to absorb the water gradually and prevents excess moisture from sitting on the leaves, which can lead to rot or fungal diseases.
Remember, different succulent species may have varying watering needs, so it's always best to research and understand the specific requirements of each plant you're propagating.
Enjoy watching your propagated succulents thrive at home
Propagating succulents at home can be an exciting and rewarding experience. Not only is it a great way to expand your collection of succulents, but it also allows you to witness the growth and development of new plants firsthand. With the right knowledge and techniques, you can successfully propagate succulents and enjoy watching them thrive in your own home.
Step 1: Choose a Healthy Parent Plant
In order to propagate succulents successfully, it's crucial to start with a healthy parent plant. Look for a mature succulent that is free from any signs of disease or pests. The parent plant should have plump leaves and a sturdy stem, indicating its overall health.
Step 2: Prepare the Propagation Medium
Next, you need to prepare a suitable propagation medium for your succulents. A common method is to use a well-draining soil mix or a succulent-specific potting mix. Ensure that the medium is porous and allows excess water to drain easily.
Step 3: Take a Leaf Cutting
To propagate succulents, you can either take leaf cuttings or stem cuttings. For leaf cuttings, gently twist or cut off a healthy leaf from the parent plant. Be careful not to damage the leaf or the stem.
Step 4: Allow the Cutting to Callus
After taking the leaf cutting, it's essential to let it dry and form a callus. This process typically takes a few days to a week. Place the cutting in a dry and shaded area, away from direct sunlight. The callus will protect the cutting from rotting when it is planted.
Step 5: Plant the Cutting
Once the cutting has callused, it's time to plant it in the prepared propagation medium. Gently press the cut end of the leaf into the soil, ensuring good contact. Avoid burying the entire leaf, as this can lead to rot. Keep the soil slightly moist and place the cutting in a bright but indirect sunlight location.
Step 6: Provide Adequate Care
Proper care is essential to ensure the successful propagation of your succulents. Water the cutting sparingly, as succulents prefer drier conditions. Allow the soil to dry out between waterings to prevent overwatering and root rot. Additionally, provide adequate sunlight to promote healthy growth.
Step 7: Be Patient
Propagation takes time, and it's important to be patient. It can take several weeks or even months for the leaf cutting to develop roots and grow into a new plant. Be consistent with your care routine and have faith in the process. Soon enough, you'll witness your propagated succulents thriving and adding beauty to your home.
By following these step-by-step guidelines, you can successfully propagate succulents at home and enjoy the satisfaction of watching your new plants grow. Remember to choose healthy parent plants, prepare the right propagation medium, take proper cuttings, provide adequate care, and be patient. Happy propagating!
Frequently Asked Questions
1. Can I propagate succulents from leaves?
Yes, you can propagate succulents from leaves. Simply remove a healthy leaf from the plant, let it dry for a couple of days, and then place it in well-draining soil. It will eventually grow new roots and a new plant.
2. How long does it take for succulent cuttings to root?
Rooting time for succulent cuttings can vary depending on the type of succulent and environmental conditions. On average, it takes about 2-4 weeks for succulent cuttings to develop roots.
3. Do I need to use rooting hormone when propagating succulents?
Using rooting hormone is not necessary for propagating succulents, as they are generally easy to root without it. However, if you want to speed up the rooting process, you can use a rooting hormone specifically formulated for succulents.
4. How often should I water newly propagated succulents?
Newly propagated succulents should be watered sparingly. It is important to let the roots establish themselves first before watering. Wait until the soil is completely dry before giving them a small amount of water, and then gradually increase the frequency as the plant grows.
If you want to read more articles similar to Step-by-Step Guide: How to Successfully Propagate Succulents at Home, you can visit the Propagation category.
Planting Succulent Cuttings: Skip Rooting Process and See Results

Exploring Root Depths in Succulents: Understanding Root Growth

Succulent Root Growth: Unveiling Patterns and Depths

Can Succulent Leaves Grow Roots When Planted in Soil?

Step-by-Step Guide: Growing a Beautiful Rose Succulent

How to Propagate a Rock Succulent by Splitting: Step-by-Step Guide
You Must Read